|
Total Time: 8 hrs. 10 min. Prep Time: 10 min. Cooking Time: None Yield: 1 serving Ingredients: ½ cup dry old fashioned rolled oats 1 scoop Vanilla Shakeology ⅔ cup water ½ tsp. pure vanilla extract 1 medium peach, chopped Preparation: 1. Combine oats and Shakeology in a medium bowl; mix well. 2. Add water and extract; mix well. Soak, covered, in the refrigerator overnight. 3. In the morning, top with peach; serve immediately. Tip: This delicious breakfast can also be made in a one-pint Mason jar. Containers: 1 Red 1 Yellow 1.5 Purple 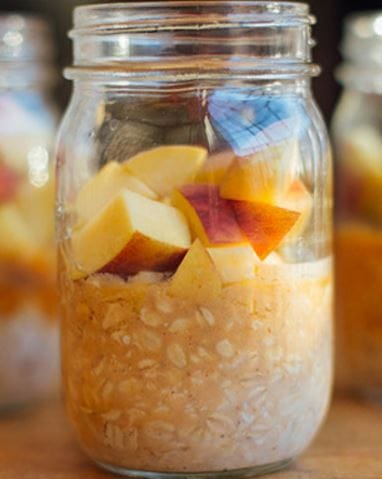
0 Comments
Have you been told that before?
You make comments like: I will never like fish, I will never have kids, I will never finish school, I will never get married..... I was recently in discussions with someone who has gotten a divorce with in the past few years and has been dating someone new for a couple years now. When the "marriage" topic would get brought up, the individual would always respond "I will NEVER get married again". Fast forward.... This individual has found they are happy. The person they are in a relationship with makes them happy. AND now plans on getting remarried. Often times the word "never" is a defense mechanism. It's a way to put up an invisible wall so defeat isn't so daunting. It becomes our "out" if something doesn't work out. I didn't complete that workout program because I said "I never would" I didn't lose weight because I said "it never works" I didn't get that job because I said good things "never" happen for me. Get my point? Listen to the words coming out of your mouth? Are they hindering you or empowering you? For you my friend are Holy.Be.Youtiful! Total Time: 10 min. Prep Time: 10 min. Cooking Time: None Yield: 10 servings, about 3 Tbsp. each Ingredients: 1 (15-oz.) can white beans or (cannellini beans), drained, rinsed ½ (12-oz.) jar roasted red peppers (not packed in oil), drained 2 fresh rosemary sprigs, leaves removed and coarsely chopped, stems discarded 4 cloves garlic, coarsely chopped 2 Tbsp. olive oil Preparation: 1. Place beans, peppers, rosemary, and garlic in in blender or food processor; cover. Blend until smooth. 2. Slowly add oil, blending constantly until blended. 3. Serve as a dipping sauce for fresh veggies.  Butternut squash and corn give naturally sweet flavor to this savory chicken soup. Using rotisserie chicken makes it an easy meal to prepare on a busy weeknight. Tip: Freeze leftover soup in individual portions using large muffin tins. Spray muffin tin with nonstick spray, then ladle soup into cups and freeze. When frozen, remove portions to a plastic bag or storage container. One serving equals about 2 frozen pieces. Total Time: 38 min. Prep Time: 15 min. Cooking Time: 23 min. Yield: 8 servings, about 1 cup each Ingredients: 1 tsp. olive oil 1 medium onion, chopped 1 medium red bell pepper, chopped 4 cups low-sodium organic chicken broth 2 Tbsp. chopped fresh thyme (or 2 Tbsp. dried thyme) Sea salt (or Himalayan salt) and ground white pepper (to taste; optional) 8 oz rotisserie chicken breast, boneless, skinless, shredded 1 cup frozen corn (or roasted corn) 2 cups cubed butternut squash Preparation: 1. Heat oil in medium saucepan over medium-high heat. 2. Add onion and bell pepper; cook, stirring frequently, for 3 to 5 minutes, or until onion is translucent. 3. Add chicken broth and thyme. Season with salt and pepper if desired; cook, stirring occasionally, for 10 minutes. 4. Add chicken, corn, and squash; cook, stirring occasionally, for 5 to 8 minutes, or until squash is soft. 5. Divide evenly between eight serving bowls. Containers ½ Green ½ Red ½ Yellow  Ingredients: SERVES: 24 (1 ball each) Prep Time: 20 min. Cooking Time: 8 min. Parchment paper 1 cup all-natural smooth peanut butter 1 Tbsp. cornstarch (preferably GMO-free) ¾ cup coconut flour 2 Tbsp. pure maple syrup Hot water 8 oz. semisweet chocolate, 62% cocoa or higher, chopped 2 tsp. extra-virgin organic coconut oil, unrefined Directions: 1. Line a large baking sheet with parchment paper. Set aside. 2. Combine peanut butter, cornstarch, coconut flour, and maple syrup in a medium bowl; blend well with a spatula until mixture forms a uniform dough. 3. Using clean hands, shape dough into twenty-four 1-inch balls; place a toothpick in the center of each ball. Place on prepared baking sheet. Refrigerate for 20 minutes. 4. Fill small saucepan with 2 inches of water; bring to a boil over high heat. Reduce heat to low. 5. Place a heat-proof mixing bowl over saucepan. Add chocolate and oil. Stir for 2 to 3 minutes, or until just melted. Make sure water does not splash into the bowl. 6. Remove balls from refrigerator. Hold a ball by the toothpick and dip into chocolate, swirling to completely coat. Return to baking sheet. Repeat with each ball. (For any uncoated areas, coat carefully with a spoon dipped into chocolate.) 7. Refrigerate for at least 1 hour, or until chocolate has hardened. 8. Store in airtight container in the refrigerator. TIPS: • You can also melt the chocolate in the microwave. Place morsels and oil in microwave-safe container. Microwave on 50% power for 30 seconds; stir. Microwave for an additional 30 to 45 seconds or until just melted. Do not overcook. • To prevent the balls from sticking to your hands when you roll them, lightly coat your hands with nonstick cooking spray. Courtesy: Fixate, Beachbody 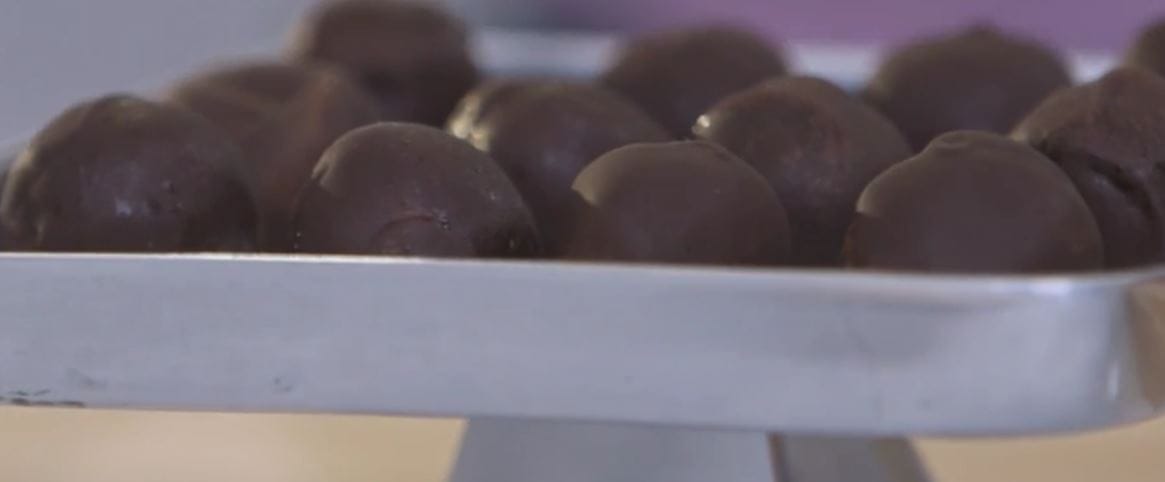 The Beachbody Health Bet is BACK!!!! Our Beachbody Health Bet starts January 9th and ends February 5th. What do you need to do? 1. Workout 3 times a week (does not have to be a Beachbody Workout) 2. Drink Shakeology 5 times a week and take a picture of it. 3. Log both of the above in The My Challenge Tracker App on your phone from January 9th to February 5th to qualify for your piece of the $2M pot (up to $3M). That's it! Do you want in? Message me as soon as possible. I will make sure you have exactly what you need and get you added to the group! It will be full of accountability, support, recipes and prizes. Don't miss out!  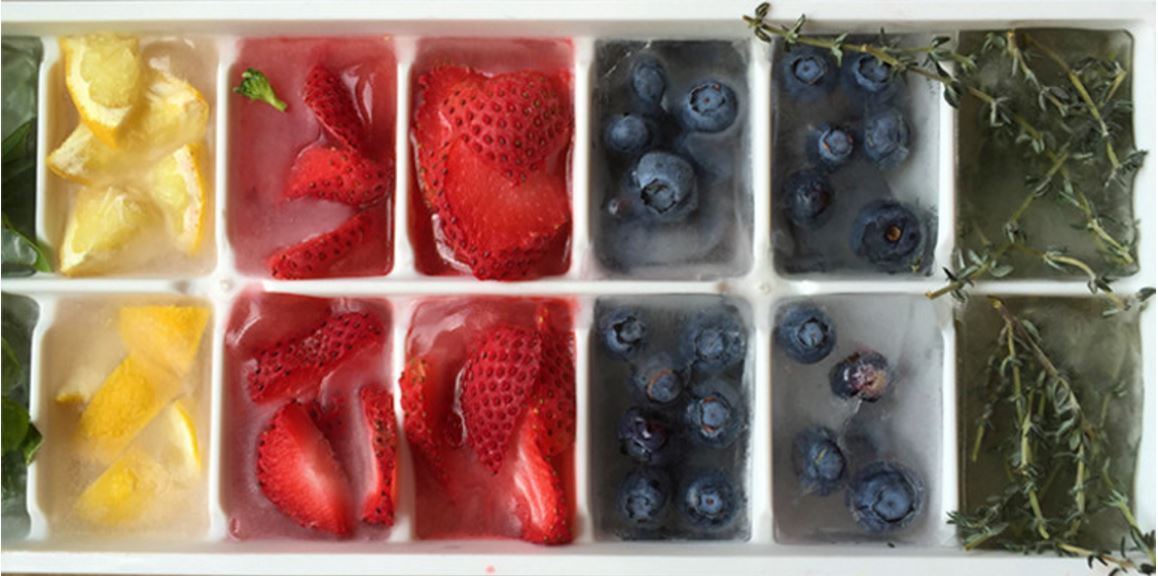 Chances are you’ve only used ice cube trays to freeze water, and that’s cool, but this under-utilized kitchen tool has a lot more potential when it comes to healthy eating and reducing food waste. Not only can you use ice cube trays to capture ingredients at their freshest (adios, powdered garlic) but you can also use them as a portioning tool as most hold about one tablespoon per well. Ready to get freezing? Here are 10 smart ways to fully appreciate your ice cube trays. 1. Pesto Don’t let homemade pesto go to waste. Instead, freeze it into individual ice cube-sized portions. Once the pesto fully freezes, pop out the cubes and store them in an air-tight bag or container to free up the tray. Then, when a pasta dish, roasted vegetable, or egg recipe calls for pesto, simply pop the frozen cube into a pan to defrost it. 2. Tomato paste As luck would have it, many recipes call for just a tablespoon or two of tomato paste. Instead of tossing what’s left over or freezing it in a big chunk in the can, separate the extra paste into individual portions. Coat an ice cube tray with non-stick spray and scoop one tablespoon of tomato paste into each well. Use the cubes as needed to add flavor and depth to soups, sauces, and casseroles. 3. Herbs Tired of using dried herbs when a recipe calls for the fresh version? Freeze fresh basil, cilantro, parsley, mint, and other herbs. Fill an ice cube tray about three quarters of the way with chopped herbs, then cover with water, oil, or broth. While the herbs’ appearance will change, their flavor will not. 4. Minced garlic or ginger There’s nothing fun about chopping up garlic and ginger every time you want to add aromatics to a dish. The next time a recipe calls for ginger or garlic, chop the whole garlic bulb or ginger root, and freeze whatever you doing use in an ice cube tray. Most recipes don’t call for large amounts of these ingredients, so consider using a smaller tray to create smaller portions. Add some oil or water to the well so the chopped pieces bind together. Once frozen, store the cubes in an air-tight bag or container in the freezer. Incorporate the flavorful cubes into soups, stews, and veggie dishes. 5. Lemon and lime juice and zest Fresh lemons and limes are great, until they sit in the fridge too long and dry out. Squeeze out the juice when the citrus fruits are fresh, and then freeze it in an ice cube tray. Use the cubes in main dishes, or use them to flavor cocktails, water, and seltzer. You can also save the zest of the citrus fruits, by filling the ice cube well with the shredded rind and adding a bit of the juice to hold it together. 6. Coffee To prevent the buzzkill that is diluted coffee, freeze cooled, freshly-brewed coffee into cubes. Toss them into home-brewed iced coffee for a morning glass of Joe that won’t get watered down by regular ice. 7. Wine The same principle applies here: Watered-down wine (or warm white wine for that matter) isn’t exactly ideal. Avoid diluting your vino by using wine cubes, or add frozen wine cubes to homemade sangria. 8. Eggs Bought too many eggs? Freeze them before they go bad. Scramble whole eggs or egg whites, then freeze in an ice cube tray. When it’s time to use them, take out as many cubes as you need, thaw them in a refrigerator, and cook them up as soon as they have defrosted. 9. No-bake energy bites For a healthy snack or a not-too-filling breakfast before a morning workout, opt for no-bake energy balls. Whip up a batch, like these birthday cake or carrot cake energy balls, and freeze the leftovers into an ice cube tray. This will help them last longer, and they’ll be a cold and refreshing treat that’s easy to take on the go. However, the calories will be slightly different than those in the recipes if the portion size isn’t the same. 10. Single-serve desserts Need a little something to satisfy your sweet tooth? Freeze single-serve desserts, such as peanut butter cups and no-bake cookies into separate wells based on the recipe’s serving size. Before dinner, pop one out and let it defrost a bit in the refrigerator while you eat, then enjoy it after your meal is over. Bonus: Because the dessert stays in the freezer, it’ll be out of sight and out of mind. Courtesy: Beachbody If you’ve wanted to try yoga, but were too intimidated, this is the perfect place to start. 3 Week Yoga Retreat is perfect if you’re new to the yoga mat, as this beginner yoga program will guide you through three weeks of basic yoga classes and help you feel less stressed, improve your flexibility, and increase your balance. The program doesn’t require any equipment (though a yoga mat, yoga block, and a strap are all helpful), and a modifier is included for each of the moves to help ease you in. 3 Week Yoga Retreat makes the moves easy to understand and was designed so you can easily follow along all from the comfort of your OWN home! After completing one 30-minute or shorter class a day, you’ll have a deeper understanding of yoga by the end of 21 days. You’ll also have the confidence to hold your own in any yoga class! If you'd like to know how you can get started and do the entire program for FREE, please contact me!  "Breathe through the tension"
It was a line spoken by the trainer in my Core De Force workout. It made me think beyond the actual stretching move and realize how it's applicable to other areas. *Have you tried reaching for your toes and started to the feel the tension (if you're not flexible) and then without realizing it, you hold your breath? *Have you ever gotten into a disagreement with someone (for example, your significant other) and have been so frustrated that you walk away or let the frustration add to past frustrations? *Have you tried a new hobby/task and just can't quite get the hang of it so instead you're left feeling defeated and overwhelmed? *Have you felt so much confusion lately with the direction of our Country that you feel all hope is lost? *Have you gotten so derailed with your nutrition and workouts that you figure "this is just how you will be"? *Have you been to the doctor recently only to have been told news that wasn't favorable? I'm sure there are plenty more examples in all of our lives that are applicable. When we push past the point of tension is when we truly overcome. _Become more flexible _Communicate better _Find joy in a hobby/task _Realize Hope shouldn't be found in man _Get nutrition and exercise on track _Experience peace about situation I pray that when you face tension, you put into practice "breathing through the tension". For you my friend are Holy Be.YOU.tiful! Defeat is Optional.
This week my daughter mastered the monkey bars without assistance. She was beaming when she did it and was so excited to show me. We decided one night she would show me and I would record her to show Daddy. She rushed to the bars and I positioned myself with my camera to capture it all. She gave the look and she started to swing from bar to bar. She got about 3/4 across before she started to struggle. Eventually she fell. I stopped the recording and stood there to see how she would react. She started sniffling and it turned into tears. She felt defeated. She was embarrassed. She didn't want to try again. I had a great opportunity to love on her with encouragement but in that moment, it also made me realize that when we deal with our own defeat we often don't dust ourselves off and keep going. We too get embarrassed and quit. Has that happened to you? *You miss a workout. You feel defeated. *You lost your temper with your kids. You feel defeated. *You blew your clean eating with a bad meal. You feel defeated. *You are starting a new business. You feel defeated. *You had a different opinion from someone. You feel defeated. *You have to learn something new. You feel defeated. In those moments of defeat. Do NOT Quit! For you my friend are Holy Be.YOU.tiful <3 |

ABOUT MEI'm PASSIONATE about: Archives
March 2017
Categories |
 RSS Feed
